
This guide walks through creating a short link in GoshLinks.
Step 1: Open the Add New Link Page
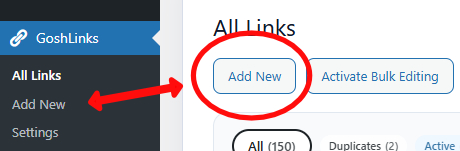
- In WordPress admin, go to GoshLinks > All Links.
- Click Add New.
Step 2: Add a Title
The Title is for your own reference. It helps you identify the link in the WordPress admin area.
Example:
Summer Sale Landing Page
Step 3: Choose a Slug
The Slug is the unique short-link identifier. If your Base Path is go and your slug is summer-sale, your short link will look like:
https://example.com/go/summer-sale
Use letters, numbers, and hyphens. Do not use spaces or special characters.
As you type, GoshLinks checks whether the slug is available. A green tick means the slug can be used. A red cross means it cannot be used.
Step 4: Enter the Target URL
The Target URL is where visitors will be sent when they visit the short link.
GoshLinks requires a valid http or https URL before the link can be created.
Step 5: Choose a Redirect Type
- 301 - Permanent redirect. Use this when the destination should be treated as permanent.
- 302 - Temporary redirect. Recommended for most campaigns, offers, affiliate links, and links that may change later.
- 307 - Temporary redirect that keeps the original browser action. Most normal short links do not need this unless a form or app workflow requires it.
Step 6: Choose a Category
Choose an existing category, leave the link uncategorised, or click the plus button to create a new category while saving the link.
Step 7: Choose Whether To Forward Parameters
If Forward URL parameters is enabled, query parameters added to the short URL are passed to the Target URL. Parameters already saved in the Target URL are kept.
Step 8: Choose QR Code Settings
If QR codes are set to per-link mode in Settings, use the Create QR code checkbox to decide whether this link should have a QR code.
If QR codes are set to always create, GoshLinks shows a note and creates the QR code automatically when the link is saved. If QR codes are disabled, the QR option is hidden.
Step 9: Add Notes If Needed
Notes are private admin notes. They are shown below the link title on the All Links page and can be used for reminders, campaign names, or internal context.
Step 10: Check the Status
Keep Status set to Active if the short link should redirect visitors immediately. Disabled links send visitors to the deactivated destination instead of the Target URL.
Step 11: Save the Link
The Create Link button becomes available when the required fields are valid. Click it to create the link.
Step 12: Test the Short Link
After saving, copy the Short URL from the All Links page and open it in a browser tab to confirm that it redirects correctly.